whoa there, pardner!
Your request has been blocked due to a network policy.
Try logging in or creating an account here to get back to browsing.
If you’re running a script or application, please register or sign in with your developer credentials here. Additionally make sure your User-Agent is not empty and is something unique and descriptive and try again. if you’re supplying an alternate User-Agent string, try changing back to default as that can sometimes result in a block.
You can read Reddit’s Terms of Service here.
if you think that we’ve incorrectly blocked you or you would like to discuss easier ways to get the data you want, please file a ticket here.
when contacting us, please include your ip address which is: 178.132.111.206 and reddit account
Тест и обзор: Gigabyte G1.Sniper Z87 — игровая материнская плата с доступной ценой
Конечно, мы внимательно рассмотрели UEFI. В случае Gigabyte G1.Sniper Z87 была доступна только первая версия UEFI «F1». Gigabyte предлагает два интерфейса UEFI. По умолчанию вы получите обновлённый интерфейс «Dashboard», который с первого взгляда позволяет считать большое количество параметров.

Если новый интерфейс вам не понравится, то можно вернуться к предыдущему интерфейсу Gigabyte UEFI (Classic Mode), который тоже претерпел изменения. Как и в случае нового UEFI от ASUS, Gigabyte предлагает возможность создать отдельные вкладки в пункте Home с наиболее часто использующимися настройками. Соответствующее меню появляется после нажатия на пункт «Select Your Own Options». Если требуется, то можно добавить до четырёх вкладок с наиболее часто используемыми настройками. В правой части выводятся ярлыки быстрого доступа к часто используемым настройкам. С их помощью вы можете быстро изменить нужные настройки и выйти из UEFI. Чуть ниже можно быстро изменить приоритеты загрузки.

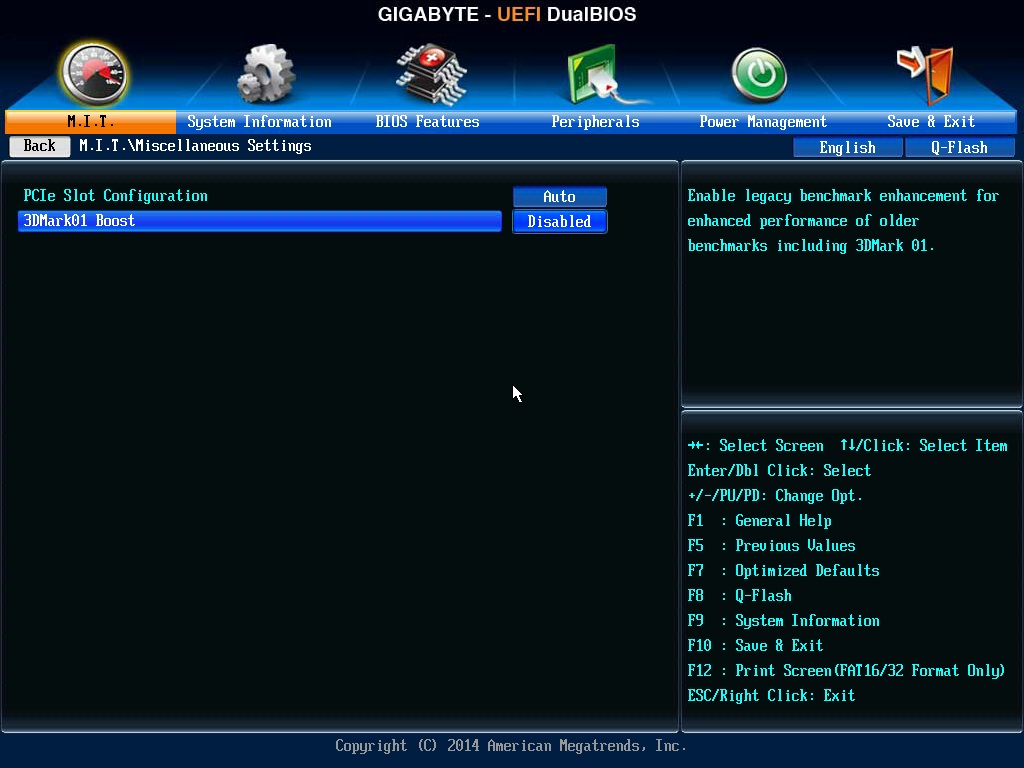
Вкладка Performance разделена на пять вкладок. Первая, под названием «Frequency», позволяет выставлять тактовые частоты CPU, BCLK и RAM. На второй вкладке «Memory» доступны расширенные настройки для памяти. Вкладка «Voltage» содержит три подменю «CPU Core Voltage Control», «Chipset Voltage Control» и «DRAM Voltage Control». В них вы можете вручную выставить нужные напряжения. В пункте можно, помимо всего прочего, выставить настройки подключенных вентиляторов. Последний пункт «Miscellaneous» предлагает только две опции: «PCIe Slot Configuration» и «3DMark01 Boost».
На следующей вкладке можно настраивать сам UEFI. Можно задавать пароль, выставлять разрешение и скорость движения курсора мыши. Также можно изменять домашнюю страницу по умолчанию и язык меню. Вы можете указать, в каком режиме (Dashboard или Classic) будет запускаться UEFI. В правой части выводится календарь. В пункте «BIOS Features» приведены дополнительные настройки. Вы можете активировать, например, быструю загрузку Fast Boot. Встроенные компоненты можно настраивать на вкладке «Peripherals». Эта вкладка разделена ещё на три меню: «Device Config» для настройки встроенных компонентов, «SATA Config» для управления портами SATA и «Super I/O Config». Последние два пункта «Power Management» и «Save & Exit» понятны по названию.
Как вы можете заметить, Gigabyte отказалась от отдельной вкладки с аппаратным мониторингом, поскольку в ней просто нет необходимости. Вся важная информация мониторинга уже выводится на экран. Слева можно видеть информацию о работе CPU, в том числе тактовую частоту, множитель, напряжения (VCore, VRIN и VAXG), температуры и скорость вентилятора кулера CPU. Ниже приводится информация о тактовых частотах памяти RAM и напряжении VDIMM (оно названо DRAM Voltage), также указываются и задержки. В верхней части экрана можно посмотреть информацию об основных напряжениях, температурах и скоростях вентиляторов. Справа выводится частота BCLK, три основных напряжения питания (3,3 В, 5 В и 12 В), температура системы и скорости вентиляторов. Наконец, в нижней части окна можно посмотреть название материнской платы, установленный процессор и часть сведений о BIOS. В любом месте UEFI доступно контекстное меню по правой клавише мыши. В нём можно выбрать следующие опции: Save & Exit, Load Profiles, Save Profiles, Performance — Frequency, Peripherals — SATA Config, Load Defaults, Resolution Toggle, Classic Setup и Help.

Как мы уже упоминали выше, вы можете использовать классический интерфейс UEFI в так называемом «Classic Mode», который был впервые представлен на материнских платах Socket 1155 с чипсетами Intel 7 Series. Разница видна с первого взгляда. На первой странице «M.I.T.» вы получите шесть пунктов меню, все из которых посвящены разгон. На вкладке «System Information» приводится название модели, базовая информация BIOS, текущая дата и время. Там же можно изменить язык меню. На вкладке «BIOS Features» можно изменить порядок загрузки устройств. Встроенные компоненты материнской платы настраиваются на вкладке «Peripherals». По сравнению с интерфейсом Dashboard, это меню тоже было немного изменено. Последние вкладки «Power Management» и «Save & Exit» говорят сами за себя.
В целом, несмотря на первую версию UEFI, мы остались довольны. Настройки выполнялись без проблем. В обоих режимах «Dashboard» и «Classic Mode» навигация была возможна с помощью мыши и клавиатуры. Впрочем, в режиме Dashboard курсор мыши двигался более приятно. В режиме Classic Mode курсор двигался рывками. Конечно, в обоих режимах вы можете пользоваться клавиатурой.
В следующей галерее приведены все скриншоты BIOS.
3DMark01 Enhancement (The Ultimate Solution For A Slow Processor)
Computers were first and foremost meant to make complex arithmetic calculations easy. But what happens when the very system that’s meant to speed up your work slows you down?
Overheating and incompatibility of software vs. hardware are some of the typical problems associated with suboptimal performance. Upgrading to the newest models is always an option, but with the speed at which tech is changing, you are bound to lose a fortune.
That’s why boosts such as 3Dmark01 Enhancement can help your old model work more efficiently. So, does the fix work, and how does it work? This post also seeks to find out the system requirements for the Enhancement to work.
What Is 3DMark?
Before diving into the 3DMark Enhancement feature, it’s important to first understand what the 3DMark software is and its importance.
3DMark is a computer benchmarking software suite owned by Futuremark, widely used to test overall system performance. By running a wide variety of tests, 3Dmark analyzes your memory configuration, processor’s (CPU) speed and power, as well as graphics card performance which reveals the overall system performance. With this informed hardware assessment, you can compare your system performance with results from other users worldwide and get to know what to expect if you were to upgrade your PC.
On top of that, 3DMark also analyzes and displays all your PC’s system specifications, from current driver versions to the hardware components. For those looking to find out if their PC is stable, 3DMark can be used as a basic system stability test by looping it for several hours.
What Is 3DMark01, and Why is it Important?
3DMark01 is a version of 3DMark that was released in 2001. With the latest installments in the popular 3DMark series having evolved to majorly focus on analyzing graphics performance and checking DirectX features compatibility, the 3DMark01 version remains the best tool from Futuremark for testing a processor’s single-thread performance today.
Single thread performance is important because it’s more reflective of a processors’ capability, as it takes into account things such as IPC (Instructions Per Cycle) and speed (frequency) combined with things such as memory configuration, which directly affect overall system performance in most applications, not just graphics-intensive ones. With most legacy software being highly single-threaded and lacking the multithreaded approach of many of today’s apps, 3DMark01 remains a crucial benchmarking tool for nostalgic tech enthusiasts and gamers.
What Is The 3DMark01 Enhancement Feature (3DMark01 Boost)? Where Can It Be Found?
Also known as the Legacy Enhancement Benchmark or 3DMark01 Boost, the 3DMark01 Enhancement feature is basically a BIOS setting found in most motherboards from popular brands like ASUS, ASRock, and Gigabyte like the Gigabyte B450 Aorus Elite, Gigabyte Z170X-Ultra Gaming ATX, Gigabyte B360M DS3H, Gigabyte F2A88X-D3HP among others.
The setting is mainly under the “Miscellaneous Settings” submenu in the BIOS. The keys for accessing the BIOS for different motherboards will differ with the manufacturer, so it’s best to check out the official website.
How Can You Enable 3DMark01 Boost?
Alongside the “3DMark01 Boost” setting in the BIOS, there is a dropdown menu with options for “ENABLE” & “DISABLE.” To turn this feature on, just switch from ENABLE” to “DISABLE” and do the opposite to revert. Simple as that.
Does The 3DMark01 Enhancement Feature Boost Performance?
Certainly, it has code that improves scores in 3DMark01 by optimizing the tests to run better on your computer’s processor and tightens CPU cache and memory timings which reduces latency.
In addition, it also helps boost the overall performance of old processors by changing how they run other legacy applications. In games, it can help you achieve more consistent FPS during gameplay, resulting in less stuttering.
Unfortunately, for most modern apps and games, the 3DMark01 Enhancement Feature won’t be practical as it’s meant for older software versions. With the last update to the 3DMark01 software released in 2006, software and games released around that time should be covered.
Should You Turn On Or Off 3DMark01 Enhancement In Your BIOS?
It depends on your specific needs. If you want better scores in 3DMark01 or to maximize the performance of your hardware to run legacy applications that you regularly need, turning on 3DMark01 Enhancement will be beneficial. However, if you mainly run modern apps and games, the 3DMark01 Enhancement won’t be necessary to turn on.
Does Turning On 3DMark01 Enhancement Bring Errors & Crashes?
Included in most computers BIOSs – old and modern – Microsoft and OEMs that make the motherboards that come with this feature have always ensured it’s compatible and works seamlessly with the latest versions of Windows and drivers.
Though we spotted a complaint that the feature didn’t play nice with one user’s computer after some Windows updates, on most forums and enthusiasts subreddits, complaints of the 3DMark01 Enhancement making errors pop up are almost non-existent.
Does The 3DMark Enhancement Feature Overclock Your Processor (CPU) And GPU?
Not really; it is not an auto-overclocking feature which means it won’t boost your processor’s frequency it or perform such advanced tweaks. The same applies to your GPU and RAM.
Is Using The 3DMark01 Enhancement Feature As Good As Overclocking?
Manually or auto-overclocking your CPU will make your old computer perform much better for all applications, unlike using the 3DMark01 Enhancement. This is because overclocking boosts voltage, which results in your processor running at a higher frequency, making it complete more instructions per cycle.
Unfortunately, for laptops, you won’t be able to overclock due to thermal and cooling constraints. As a note, overclocking will void your warranty while the 3DMark01 boost won’t.
Conclusion: Hardware And Software Requirements Required For 3DMark01 Enhancement
As it is a feature targeted at the 3DMark01 tool that’s used to test overall system performance, minimum requirements that should get the 3DMark01 Enhancement Feature working on your computer aren’t strict.
Official minimum requirements are
● Intel processor (CPU) running at 500 MHz or above
● Graphics Card with 32 MB of video memory (DirectX 8 and above compatible)
Before turning on the feature in your BIOS, ensure your Windows OS and drivers are up-to-date.
Pigtou.com is supported by its audience. When you buy through the links on our website, we may earn a small commission.
A group of tech enthusiasts who find pleasure in troubleshooting and resolving various issues. When we’re not engaged in writing, we typically enjoy playing table football or spending time with our office dog.
Should i Enabled or Disable 3D Mark01 Enhancement


But honestly all you can do is OC the chip to get better performance or lock the turbo speed.
Create an account or sign in to comment
You need to be a member in order to leave a comment
Create an account
Sign up for a new account in our community. It’s easy!
Sign in
Already have an account? Sign in here.